Drywall is the standard material for interior walls in most modern homes. While it is durable and provides a smooth surface for paint or wallpaper, it is also susceptible to damage. Everyday life: moving furniture, hanging heavy mirrors, or even a door handle swinging too hard: can result in dents, scuffs, and holes. Fortunately, repairing small-scale drywall damage is a manageable DIY task that requires only a few basic tools and a bit of patience.
Understanding the mechanics of drywall repair allows homeowners to maintain the aesthetic integrity of their living spaces without the need for professional intervention. This guide provides a comprehensive walkthrough for addressing common wall imperfections, ensuring a seamless finish that blends perfectly with the surrounding surface.
Understanding Drywall Damage
Before reaching for a putty knife, identifying the type of damage is the first step toward a successful repair. Not all imperfections are treated equally.
- Dents and Dings: These are shallow depressions where the drywall surface has been compressed but not punctured.
- Nail Holes: These are small, deep punctures caused by picture hangers or nails.
- Nail Pops: These occur when a fastener (nail or screw) pulls away from the wooden stud behind the drywall, causing a circular bump or a small crack on the surface.
- Small Holes: Typically ranging from one to six inches, these punctures go all the way through the drywall sheet.
- Stress Cracks: These often appear near door frames, windows, or corners due to the natural settling of the house or changes in humidity.
By categorizing the damage, the appropriate materials and techniques can be selected to ensure the repair lasts.
Essential Tools and Materials
A successful repair depends heavily on having the right supplies. Using the wrong type of compound or sandpaper can lead to visible patches or cracking later on.
Basic Supplies
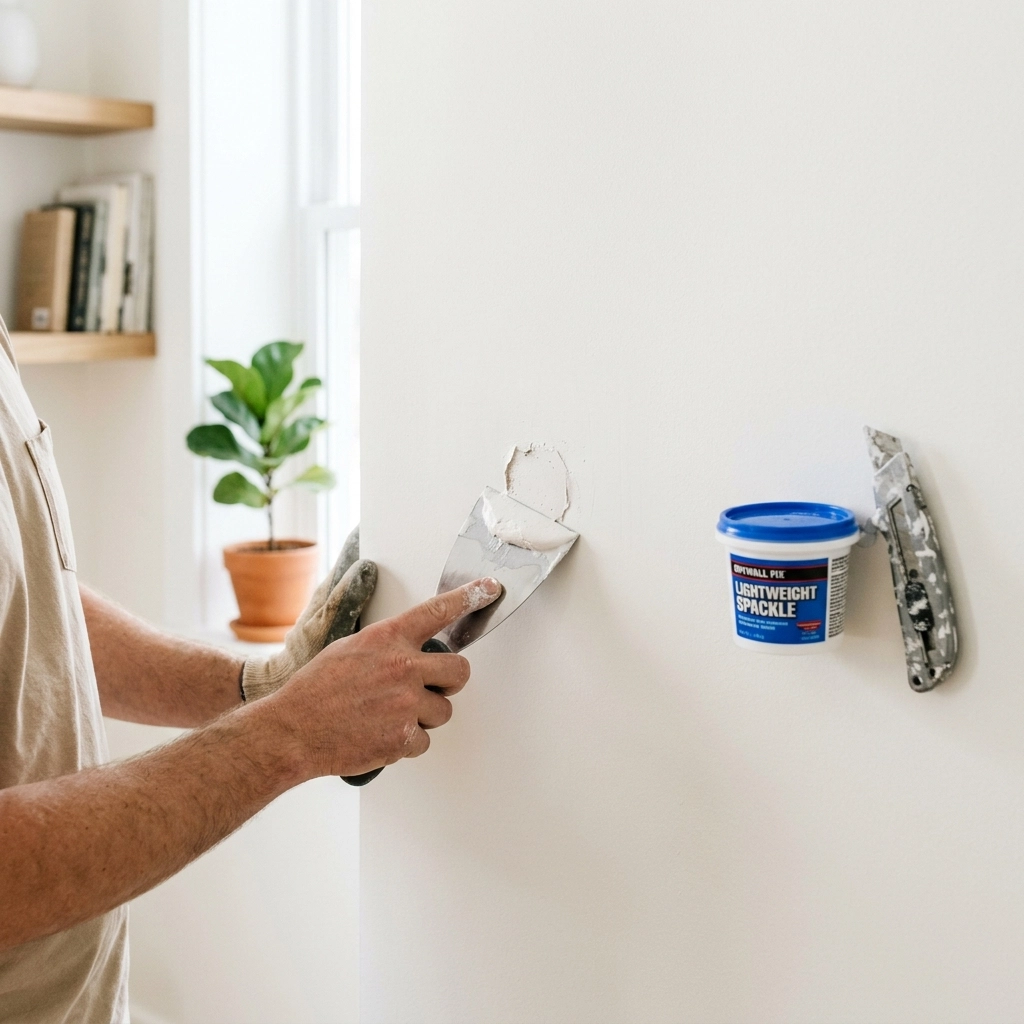
- Putty Knives: A 2-inch or 3-inch knife is ideal for small dents and nail holes. A 6-inch knife is better for spreading compound over larger patches.
- Spackling Paste: Lightweight spackle is preferred for tiny holes and dents because it dries quickly and shrinks very little.
- Joint Compound: For holes larger than a half-inch, an all-purpose or “setting-type” joint compound provides more structural strength than spackle.
- Sandpaper: Fine-grit sandpaper (120 to 220 grit) or a sanding sponge is necessary for smoothing the surface.
- Utility Knife: Used for cleaning up ragged edges around a hole.
Specialized Materials
- Self-Adhesive Mesh Patches: These are essential for holes between two and six inches. They provide a bridge for the compound to cling to.
- Drywall Screws: Necessary for fixing nail pops or securing loose sections of wall.
- Tack Cloth or Microfiber Rag: Used to remove dust before painting.
- Primer: A critical step to prevent the patch from absorbing paint differently than the rest of the wall.

Repairing Dents and Tiny Nail Holes
Dents and nail holes are the most common forms of drywall damage. These are superficial and do not require structural reinforcement.
Step 1: Surface Preparation
Begin by removing any loose debris. If a nail was pulled out, there might be a small “mushroom” of drywall paper protruding from the wall. Use the butt end of a screwdriver or the handle of a putty knife to gently press this protrusion back into the hole, creating a slight divot. This ensures the patch will sit flush or slightly below the wall surface.
Step 2: Applying Spackle
Scoop a small amount of lightweight spackle onto the putty knife. Press the spackle into the hole or dent at a 45-degree angle. Once the hole is filled, hold the knife at a 90-degree angle and swipe across the area to remove excess material. The goal is to leave the spackle level with the wall.
Step 3: Drying and Sanding
Spackle usually dries within 15 to 30 minutes, though thicker applications may take longer. Once dry, use a fine-grit sanding sponge to lightly smooth the area. Avoid over-sanding, which can damage the surrounding drywall paper.
Addressing Nail Pops
Nail pops are common in newer homes or after significant seasonal changes. They indicate that the drywall has moved slightly away from the framing.
The Fix
To fix a nail pop properly, the drywall must be re-secured. Driving the original nail back in is rarely a permanent solution. Instead, drive a drywall screw into the stud approximately one inch above or below the pop. This pulls the drywall tight against the wood.
Once the wall is secure, use a utility knife to remove any loose paint or plaster from the original nail pop. Use the back of a putty knife to create a small indentation over the old nail and the new screw head. Fill both with two thin coats of joint compound, sanding lightly between each coat. For more information on common home maintenance questions, the frequently asked questions page may offer additional insights.

Patching Small Holes (Up to 6 Inches)
Holes caused by doorknobs or accidental impacts require a more robust approach than simple spackling. Because there is no backing behind the hole, the compound needs support.
Step 1: Clean the Edges
Use a utility knife to trim away any frayed paper or crumbling gypsum from the edges of the hole. A clean edge allows the patch to adhere better.
Step 2: Apply a Mesh Patch
Center a self-adhesive fiberglass mesh patch over the hole. These patches are thin but strong enough to span the gap. Press it firmly against the wall to ensure it sticks.
Step 3: The First Coat of Compound
Using a 6-inch putty knife, apply a layer of joint compound over the mesh. Start from the center and spread outward. The first coat should be just thick enough to cover the mesh pattern. Do not worry about making it perfect; focus on coverage.
Step 4: Feathering the Edges
“Feathering” is the technique of thinning the compound at the edges so it transitions seamlessly into the flat wall. Apply more pressure to the outer edges of the putty knife as you spread the compound. This creates a gradual slope that is invisible to the eye once painted.
Step 5: Secondary Coats
Joint compound shrinks as it dries. After the first coat is completely dry (usually 4 to 24 hours depending on humidity), sand away any high ridges and apply a second, wider coat. This second layer should extend 2 to 3 inches beyond the first coat to further hide the hump of the patch.

Repairing Hairline and Stress Cracks
Cracks often appear above doors or windows due to structural shifting. Simply painting over them will not work, as they will likely reappear.
Widening the Crack
To ensure the repair material can get deep into the wall, use the corner of a putty knife or a utility knife to “V-out” the crack. This involves widening the crack into a V-shape.
Filling and Taping
For very fine cracks, a flexible, high-quality spackle may suffice. However, for cracks that have appeared more than once, apply a thin layer of joint compound followed by a strip of mesh tape. This provides the tension strength needed to resist future movement. Cover the tape with joint compound, feathering the edges as described in the hole repair section.
Sanding for a Professional Finish
Sanding is the most important step for achieving an invisible repair. However, it is also the messiest.
- Dry Sanding: Use a fine-grit sanding sponge. Use circular motions and light pressure. If the compound starts to “pill” or roll up, it is not dry yet. Stop and wait longer.
- Wet Sanding: For those who want to avoid dust, a damp (not dripping) large-pore sponge can be used to smooth the compound. This method takes more skill but keeps the room clean.
- Lighting: To check the quality of the work, hold a flashlight or work lamp at a steep angle against the wall. This “raking light” will cast shadows on any bumps, ridges, or pits that still need attention.

Priming and Painting the Patch
A common mistake is applying paint directly onto dried joint compound or spackle. Drywall compound is highly porous. If painted directly, it will absorb the moisture from the paint, leading to a dull, flat spot known as “flashing.”
The Importance of Primer
Always apply a coat of primer to the patched area first. This seals the compound and ensures the topcoat of paint adheres evenly and matches the sheen of the rest of the wall. For those interested in staying updated on home improvement tips and learning opportunities, subscribing to the newsletter is a helpful resource.
Matching Texture
If the wall has a texture (like orange peel or knockdown), a smooth patch will stand out. You can purchase aerosol texture sprays at most hardware stores. Practice on a piece of cardboard first to match the intensity of the existing wall texture before spraying the patch. Once the texture is dry, then apply the primer and paint.
Common Mistakes to Avoid
- Over-applying Material: It is much easier to apply a second thin coat than it is to sand down a massive hump of dried compound.
- Ignoring Dust: If you don’t wipe the dust off after sanding, the paint will adhere to the dust rather than the wall, causing it to peel off in sheets later.
- Using Old Compound: Joint compound can expire or dry out in the tub. If it feels gritty or has a sour smell, discard it and use a fresh batch.
- Rushing Drying Times: Applying a second coat over a damp first coat will trap moisture, leading to cracks and potential mold growth.

Summary of Maintenance
Maintaining the walls of a home is a continuous process. By addressing small dents and holes as they occur, homeowners can prevent minor issues from becoming major repairs. These skills are fundamental to home upkeep and provide a foundation for more advanced DIY projects.
For those looking to expand their knowledge beyond home repairs into other areas of personal development or specialized skills, visiting the about page provides a deeper look into the learning resources available. Whether it is fixing a wall or mastering a new hobby, the principles of patience and the right tools remain the same.
By following these steps, even a total beginner can achieve professional-looking results. The key is in the preparation, the feathering of the compound, and the final sanding. With these techniques, a damaged wall can be restored to its original, pristine condition.

