A squeak is more than just an auditory nuisance; it is a mechanical distress signal. Whether it is the high-pitched whine of a bedroom door or the rhythmic groan of a floorboard, these sounds indicate friction, loose components, or a lack of lubrication. While the immediate impulse is often to reach for a can of spray lubricant and coat every visible surface, this approach is rarely the most effective.
Fixing household squeaks requires a systematic approach that addresses the root cause rather than just masking the symptom. By following a structured sequence of diagnosis, mechanical adjustment, cleaning, and targeted lubrication, most household noises can be eliminated permanently. This guide outlines the essential steps to restoring silence to the home, starting with the most critical first move: identification.
The Diagnostic Phase: Locating the Exact Source
The primary reason many DIY repairs fail is incorrect diagnosis. Sound travels easily through rigid structures like wood and metal, often making it difficult to pinpoint the exact origin of a squeak. A sound that seems to come from the middle of a door might actually be originating from the bottom hinge.
Precision Listening Techniques
Before attempting any physical repair, spend several minutes observing the noise. Move the offending item: be it a door, a drawer, or a chair: as slowly as possible. Rapid movement can create multiple sounds that blend together, obscuring the primary point of friction.
For furniture or floorboards, use weight distribution as a diagnostic tool. Shift weight from one leg of a chair to another, or step on individual boards to see which one triggers the sound. Placing a hand on various parts of the structure while it moves can also help; vibration is often palpable at the source of a squeak.
Identifying the Material Conflict
Determine what materials are rubbing together. Household squeaks generally fall into three categories:
- Metal-on-Metal: Common in hinges, bed frames, and appliance mechanisms. This usually produces a high-pitched, sharp sound.
- Wood-on-Wood: Found in floorboards, stairs, and cabinetry. This produces a deeper, creaking or groaning sound.
- Metal-on-Wood: Occurs when a loose nail or screw rubs against the surrounding timber. This often sounds like a click or a sharp pop.

Mechanical Adjustments: The Power of the Screwdriver
Once the source is identified, the next step is not lubrication, but stabilization. A significant percentage of household squeaks are caused by components that have loosened over time. When a screw or bolt loses its grip, the parts it is meant to hold together begin to move independently, creating friction.
Tightening Fasteners
Check every screw, bolt, and nut near the sound source. Over years of use, the vibrations of a house: ranging from foot traffic to temperature fluctuations: can back these fasteners out of their holes.
When tightening, use a screwdriver that fits the head of the screw perfectly to avoid stripping the metal. For wooden items, turn the screw until it is snug, but do not over-tighten, as this can strip the wood fibers and make the problem worse. For metal frames, such as bed bases, using a wrench to ensure every bolt is firmly seated can often resolve a squeak instantly without any need for oils.
Realigning Components
Sometimes a squeak is caused by misalignment. A door that has sagged on its hinges will rub against the frame. A drawer that is not sitting squarely on its tracks will bind and screech. Before applying lubricant, ensure that the item is hanging or sitting level. Shifting a hinge slightly or adjusting the feet of a heavy appliance can eliminate the contact point that was creating the noise.
Surface Preparation: Why Cleanliness Prevents Noise
Applying lubricant to a dirty surface is a common mistake. Dust, pet hair, and grit can act as abrasives. When mixed with oil or grease, these particles form a grinding paste that can accelerate wear on hinges and tracks.
Removing Debris
Wipe down the area thoroughly. For sliding door tracks or window channels, use a vacuum to remove loose dirt. For hinges, a dry cloth is usually sufficient. If the area has been previously lubricated and has become “gunked up,” use a mild degreaser to clean the surface back to the base material.
A dust removing brush can be particularly useful for reaching into the tight crevices of window tracks or the intricate parts of folding furniture. Ensuring the surface is pristine allows the lubricant to bond directly with the material, providing a longer-lasting fix.

The Science of Lubrication: Selecting Your Medium
Not all lubricants are created equal. Using the wrong product can lead to long-term issues, such as attracting more dust or damaging sensitive finishes.
Dry vs. Wet Lubricants
- Dry Lubricants (Graphite, Talc): These are ideal for wood-on-wood contact or areas where you want to avoid a greasy residue. Graphite powder is excellent for locks, while talc or specialized floor powders work well for squeaky floorboards.
- Silicone Sprays: These are versatile and water-resistant. They work well on plastic, metal, and rubber. Because they dry quickly and leave a clear film, they are preferred for sliding tracks and window seals.
- Lithium Grease: This is a heavy-duty lubricant best suited for metal-on-metal applications that bear weight, such as garage door tracks or heavy hinges.
- Light Machine Oil: This is the standard choice for small household hinges. It penetrates well but should be used sparingly to avoid drips.
It is important to note that while products like WD-40 are famous for “fixing” squeaks, the standard formula is primarily a solvent and water displacer. It provides temporary relief but evaporates quickly. For a permanent fix, a dedicated lubricant is superior.
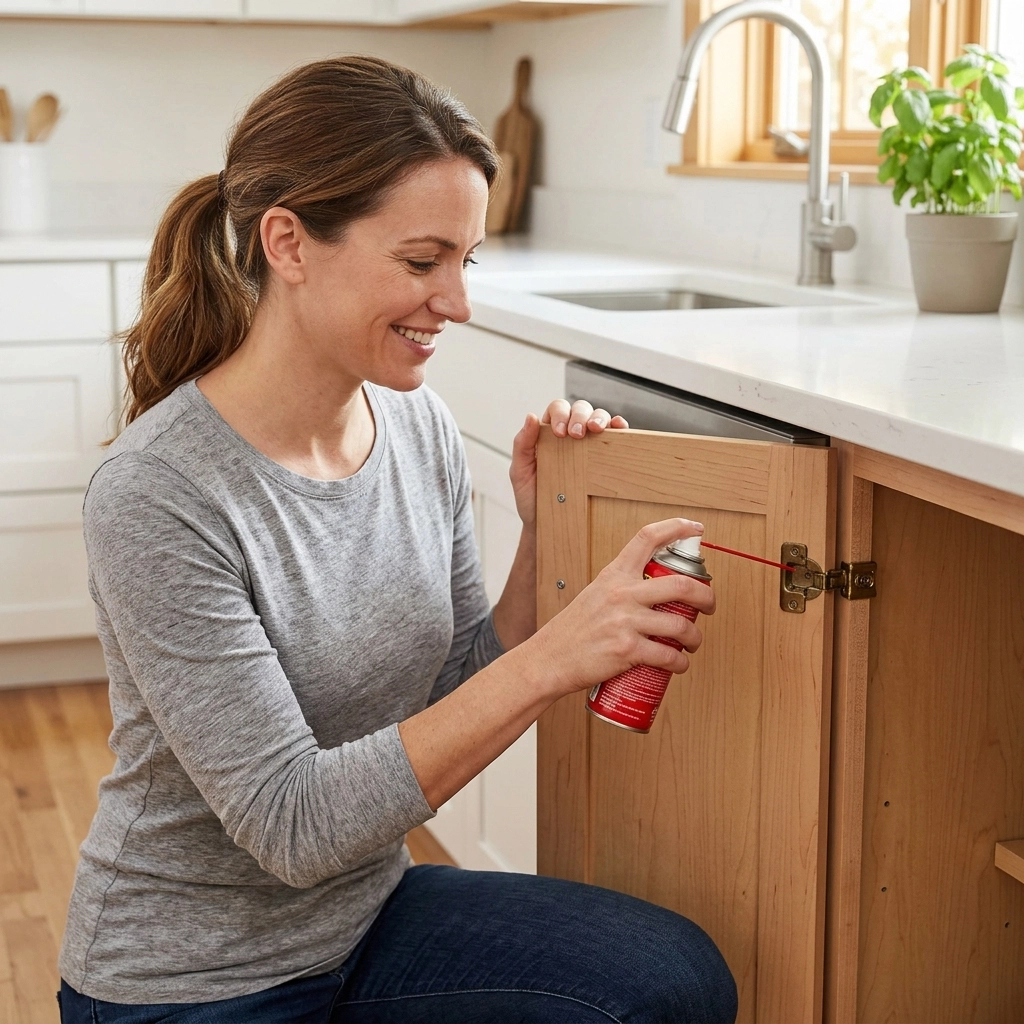
Door Hinges: A Step-By-Step Resolution
The squeaky door is perhaps the most iconic household annoyance. While it seems simple, a thorough fix involves more than a quick spray.
- The Surface Fix: If the squeak is minor, apply a few drops of light machine oil or a burst of silicone spray to the top of the hinge where the pin enters the barrel. Open and close the door several times to work the fluid down into the joint.
- The Deep Fix (Pin Removal): For persistent squeaks, the hinge pin must be removed. Use a hammer and a nail or a punch to gently tap the pin upward from the bottom. Once the pin is out, wipe it clean. If it shows signs of rust, use a piece of fine-grit sandpaper or steel wool to buff it smooth.
- Lubrication: Apply a thin layer of white lithium grease or petroleum jelly to the pin. Reinsert the pin and tap it back into place. Wipe away any excess grease that squeezes out. This method ensures the entire internal surface of the hinge is protected.

Silencing the Floor: Dealing with Wood and Subfloors
Squeaky floors are often the result of seasonal changes. As humidity drops in the winter, wood shrinks, creating gaps between boards or between the floor and the subfloor. When someone walks across the floor, the boards rub against each other or against the nails holding them down.
The Lubricant Method for Minor Gaps
For minor squeaks in hardwood or laminate floors, a dry lubricant can be effective. Sprinkle talcum powder or powdered graphite over the noisy joint. Use a soft brush to work the powder into the cracks, then walk over the area to help it settle. This reduces the friction between the boards.
The Mechanical Method for Subfloors
If the squeak is caused by a board lifting from the subfloor, lubrication will not suffice. If there is access to the underside of the floor (from a basement or crawlspace), a helper can walk above while the source is marked from below. A small wood shim coated in carpenter’s glue can be tapped into the gap between the joist and the subfloor to stop the movement.
If there is no access from below, specialized floor screws can be used. These are designed to snap off below the surface of the wood, leaving only a tiny hole that can be filled with wood putty.
Furniture and Beds: Eliminating Midnight Creaks
Wooden bed frames and chairs often develop squeaks at the joints. Because these items are subjected to constant movement and weight shifts, the joints can become compressed.
Tightening Frames
Most modern furniture is held together with Allen bolts or Phillips head screws. Begin by tightening every single fastener. If a bed frame continues to squeak, the issue is often wood-on-wood friction at the slats or the headboard connection.
Buffering the Friction
For areas where wood slats rub against a metal or wood frame, a buffer is required. Rubbing a bar of dry soap or a paraffin wax candle onto the contact points creates a slick surface that prevents noise. For a more permanent solution, adhesive-backed felt strips can be applied to the frame where the slats rest. This provides a soft cushion that eliminates both the sound and the wear on the wood.

Windows and Sliders: Ensuring Smooth Operation
Windows that screech when opened are usually suffering from a buildup of grime in the tracks or dried-out rubber seals.
Cleaning the Tracks
The first step is always a deep clean. Dirt in a window track acts like sandpaper. Use a stiff brush and a vacuum to clear out the debris. For sliding glass doors, check the rollers at the bottom. These often collect hair and carpet fibers.
Proper Lubrication for Sliders
Never use heavy grease or oil on window tracks, as it will attract dirt and eventually seize the mechanism. Instead, use a dry silicone spray. Spray it onto a cloth and wipe the tracks and the rubber weatherstripping. This will allow the window to glide smoothly without creating a sticky residue.
Kitchen and Laundry Appliances: Mechanical Maintenance
Appliances have many moving parts that can become noisy over time. While some noises indicate a failing motor or bearing that requires a professional, others are simple fixes.
Dryer Squeaks
If a dryer squeaks, it is often due to the idler pulley or the drum rollers. These are mechanical parts that require specific lubricants. However, many external squeaks come from the dryer’s leveling legs. If the machine is not level, it will vibrate and groan. Adjust the feet until the machine is perfectly stable on the floor.
Refrigerator and Oven Doors
Hinges on kitchen appliances are subject to heat and moisture, which can strip away factory lubricants. A small amount of food-grade silicone spray or high-temperature grease can be applied to the pivot points to restore silent operation.

Cabinetry and Drawers: The Hidden Sources of Friction
Kitchen and bathroom cabinets are used dozens of times a day. When they start to squeak, it is usually the result of the hinge spring drying out or the drawer slides losing their alignment.
Hinge Tension
Modern “soft-close” hinges have internal mechanisms that can sometimes click or squeak. Often, there is a small adjustment screw on the hinge that controls the tension. Adjusting this can sometimes resolve the noise. If the hinge is a traditional butt hinge, the “pin removal” method used for standard doors is the best approach.
Drawer Slides
Metal drawer slides should be cleaned of any kitchen grease. Once clean, a light application of silicone spray along the track will usually suffice. If the drawer is an older wood-on-wood style, rubbing the bottom of the drawer and the internal runners with a candle or bar soap is the most effective traditional remedy.
Organizing Your Repair Tools
To handle these household tasks efficiently, maintaining a small, dedicated toolkit is beneficial. Instead of searching for tools every time a squeak appears, keep the essentials together.
A car trunk storage bag is an excellent way to organize lubricants, screwdrivers, and cleaning brushes. While designed for vehicles, its sturdy compartments make it a portable “squeak-fix kit” that can be easily carried from room to room.
The Essential Squeak-Fix Kit:
- A set of Phillips and flat-head screwdrivers.
- An Allen key (hex key) set for furniture.
- A can of silicone spray.
- A small bottle of light machine oil.
- A bar of paraffin wax or dry soap.
- Talcum powder.
- A cleaning brush and microfiber cloths.
When to Replace: Recognizing Irreparable Damage
While most squeaks can be fixed with the steps above, there are times when the noise indicates structural failure.
Structural Failures
If a wooden joint in a chair or bed frame is visibly cracked, lubrication will not help. The wood has lost its integrity and must be repaired with wood glue and clamps or replaced entirely. Similarly, if a hinge is so rusted that the metal is flaking away, it is safer and more effective to replace the hinge than to attempt to revive it.
Stripped Screw Holes
If a screw keeps spinning and won’t tighten, the wood fibers inside the hole are stripped. A common fix is to remove the screw, insert a few wooden toothpicks coated in wood glue into the hole, and then drive the screw back in. However, if the hole is significantly enlarged, the component may need to be moved or a larger fastener used.
The Preventative Approach
The best way to deal with household squeaks is to prevent them from occurring. This involves a regular maintenance schedule. Once a year, go through the home and perform a “tighten and lube” check.
- Check the screws on high-traffic doors.
- Clean the tracks of sliding windows before the dusty season begins.
- Ensure furniture bolts are snug.
- Keep humidity levels consistent in the home to minimize the expansion and contraction of wood floors.
By addressing these minor issues before they turn into audible squeaks, you extend the life of your home’s components and maintain a peaceful environment. Silence in a home is often the result of small, consistent mechanical care. Following the “Do This First” philosophy ensures that you are always working with the grain of the problem, solving it efficiently and permanently.

