Drywall is the silent backbone of modern interior design. It provides smooth, clean surfaces for paint and wallpaper, yet it is notoriously susceptible to minor damage. From the tiny puncture of a picture-hanging nail to the annoying indentation left by a wayward doorknob, small holes are an inevitable part of home occupancy. While these blemishes may seem insignificant, they can detract from the overall aesthetic of a room and, if left unaddressed, can lead to further crumbling of the gypsum core.
Repairing these imperfections is a fundamental skill in home maintenance. It does not require a professional contractor or expensive machinery. With the right materials and a methodical approach, anyone can restore a wall to its original, seamless state. This guide provides a comprehensive walkthrough for patching small drywall holes, covering everything from material selection to the final coat of paint.
Understanding the Anatomy of a Drywall Repair
Before picking up a putty knife, it is important to understand what drywall is and why certain repair methods work. Drywall, also known as gypsum board or plasterboard, consists of a layer of gypsum plaster pressed between two thick sheets of paper. When a hole is created, both the paper and the gypsum are compromised.
A successful repair must address two things: structural integrity and surface uniformity. For very small holes, the “structure” is provided by the surrounding solid drywall. For slightly larger holes, a patch or mesh is required to bridge the gap and provide a backing for the filler material. The goal is always to create a surface that is flush with the existing wall, with no visible ridges or depressions.
Essential Tools and Materials
A well-equipped repair kit prevents mid-project trips to the hardware store. For small repairs: typically defined as holes ranging from a pinprick to about four inches in diameter: the following items are necessary.
Patching Compounds
There are two primary types of filler: spackle and joint compound.
- Spackle: Ideal for very small holes (nail holes). It is thicker and shrinks less than joint compound, often allowing for a one-coat repair.
- Joint Compound: Better for holes over an inch wide. It is easier to sand and “feather” (thin out) over a larger area, which is crucial for making the patch invisible.
Application Tools
- Putty Knives: A 2-inch knife is perfect for nail holes, while a 4-inch or 6-inch flexible taping knife is better for spreading compound over mesh patches.
- Utility Knife: Necessary for cleaning up the edges of the hole and removing loose paper.
Sanding and Finishing
- Sanding Blocks or Sponges: Fine-grit (120 to 220 grit) is best for drywall.
- Tack Cloth: A sticky cloth used to remove every trace of dust before painting.
- Mesh Patches: Self-adhesive fiberglass mesh squares used to bridge holes that are too large for compound alone.
Preparation and Cleanup
- Drop Cloths: Drywall dust is extremely fine and travels easily.
- Primer and Paint: Essential for sealing the repair and matching the wall color.
- Organizational Tools: Keeping small tools organized in a rotating cosmetic receiving box or a similar partitioned container can keep the workspace efficient.

Step 1: Preparation of the Area
The most common cause of a failed drywall repair is poor preparation. If the compound is applied to a dirty or loose surface, it will eventually crack or peel away.
First, inspect the hole. If there are jagged pieces of the paper facing or loose chunks of gypsum, use a utility knife to carefully trim them away. The edges of the hole should be clean and slightly recessed. If a nail caused a “mushroom” effect: where the drywall bulges outward: take the butt end of the putty knife and gently tap the bulge into the wall to create a small dimple.
Clean the area with a damp cloth to remove dust and oils. If the repair is near the floor or in a high-traffic area, clearing the space of furniture and laying down a drop cloth is a vital step for dust management.
Step 2: Repairing Tiny Punctures (Nail and Screw Holes)
Nail and screw holes are the easiest to fix but often the most numerous. These usually do not require a mesh patch.
- Apply the Spackle: Scoop a small amount of spackle onto the edge of a 2-inch putty knife.
- Fill the Hole: Press the spackle into the hole with a firm, wiping motion.
- Level the Surface: Hold the knife at a 45-degree angle and swipe across the hole to remove excess material. The goal is to leave the spackle slightly higher than the wall surface, as it may shrink slightly as it dries.
- Drying: Most modern spackles dry within 30 minutes. Some products even change color (from pink to white) when they are ready to be sanded.
Step 3: Patching Mid-Sized Holes (1 to 4 Inches)
Holes caused by doorknobs or heavy wall anchors require a more robust approach. Without a backing, the compound will simply fall through the hole into the wall cavity.
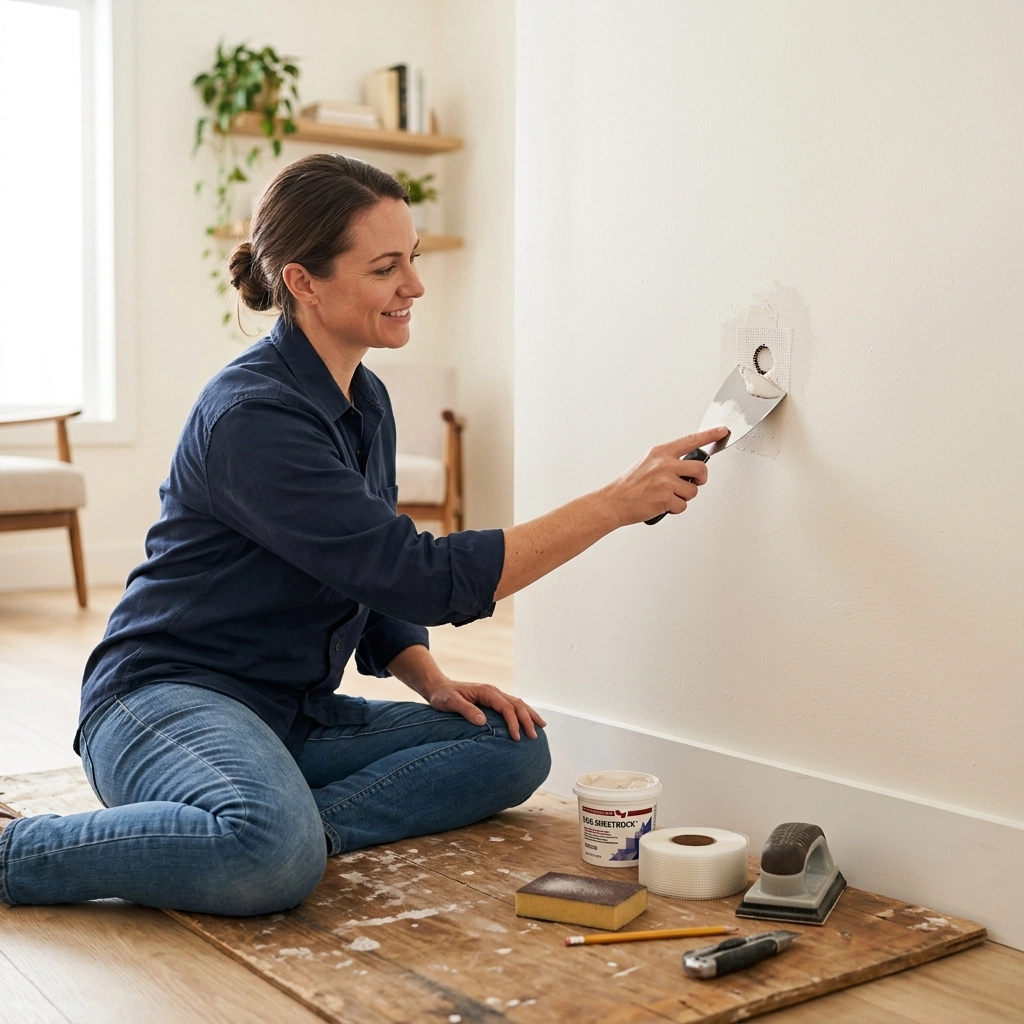
Using the Self-Adhesive Mesh Patch
A fiberglass mesh patch is the standard solution for these repairs. It is thin enough to be hidden by compound but strong enough to provide a bridge.
- Center the Patch: Peel the backing off the mesh patch and center it over the hole. Press it firmly against the wall so it adheres well.
- The First Coat: Use a 6-inch taping knife to apply a layer of joint compound over the mesh. Start from the center and work outward. The goal is to fill the holes in the mesh and cover the edges.
- Feathering: This is the most important technique. As you move the knife away from the hole, gradually decrease the pressure on the outer edge of the knife. This thins the compound out to almost nothing at the perimeter, making the “hump” of the patch less noticeable.
- Avoid Perfection: Do not overwork the first coat. It will look messy, and the mesh may still be slightly visible. This is normal.

Step 4: The Art of Layering and Drying
Drywall repair is a game of patience. Applying one thick layer of compound often leads to cracking and an uneven finish. Instead, the “thin-and-multiple” approach is superior.
After the first coat is dry (which can take 4 to 24 hours depending on humidity), use the putty knife to scrape off any high ridges or “burrs.” Do not sand yet; just flatten the surface.
Apply a second coat of joint compound, extending the edges 2 or 3 inches beyond the first coat. This further feathers the repair into the wall. If the hole was particularly deep, a third coat may be necessary. Between each coat, ensure the surface is completely dry. A damp patch will “gum up” the sandpaper and ruin the finish.
Step 5: Professional Sanding Techniques
Sanding is where the repair becomes invisible. Because drywall dust is invasive, always wear a mask.
Use a fine-grit sanding sponge. Sand in a circular motion, focusing primarily on the outer edges of the patch where it meets the original wall. The transition should be so smooth that you cannot feel it when you run your hand across it with your eyes closed.
If you find a small pit or air bubble after sanding, do not try to sand it away: this will only make the patch thinner. Instead, apply a tiny “skim coat” of compound, let it dry, and sand again.
Once sanding is complete, the cleanup begins. Using a multifunctional dust-removing brush can help clear the fine white powder from the wall and surrounding moldings before you bring out the paint.

Step 6: Texture Matching
If your walls are perfectly smooth, sanding is your final step before painting. However, many homes feature textured walls, such as “orange peel” or “knockdown.” A smooth patch on a textured wall will stand out like a sore thumb.
Orange Peel Texture
This can be replicated using a spray-on texture available in aerosol cans. Practice on a piece of cardboard first to adjust the nozzle. Spray the patch in a light, hopping motion.
Knockdown Texture
Apply the spray texture as you would for orange peel, but let it sit for about 10 to 15 minutes. Once it has begun to set, use a wide, clean putty knife to very gently “knock down” the peaks of the texture, flattening them out to match the surrounding wall.
Hand-Applied Texture
For subtle textures, a damp sea sponge can be dabbed into joint compound and then pressed onto the patch to create a stippled effect.
Step 7: Priming and Painting
One of the most common mistakes is painting directly over a dry patch. Drywall compound is extremely porous; it will “suck” the moisture out of the paint, resulting in a dull, flat spot known as “flashing.”
The Importance of Primer
Apply a high-quality primer to the patch. This seals the compound and ensures the paint adheres uniformly. Let the primer dry completely.
Painting Technique
When applying the final paint, use the same tool that was used for the original wall (usually a roller with a specific nap).
- Load the roller lightly: Do not soak it.
- Feather the paint: Start in the center of the patch and roll outward, lifting the roller slightly as you reach the edges of the repair. This blends the new paint with the old.
If the wall has faded significantly over the years, the patch might still be visible due to a color mismatch. In this case, it is often best to paint the entire wall from corner to corner to ensure a uniform look.

Troubleshooting Common Issues
Even with a detailed guide, challenges can arise. Here is how to handle the most frequent drywall repair hurdles.
The Patch is Bubbling
If bubbles appear in the compound, it is usually due to air trapped in the mesh or a layer of compound that was applied too thickly over a dusty surface. Scrape the bubbles out, ensure the area is clean, and reapply a thinner coat.
The Sandpaper is Clogging
If the compound turns into a thick paste on your sandpaper, it is not dry. Stop immediately and wait several more hours. Using a heater or a fan can speed up the process, but do not use a high-heat hair dryer, as this can cause the compound to crack.
The Paint Doesn’t Match
Paint changes color as it ages and is exposed to UV light. If you have the original can but the color is off, try “feathering” the paint out over a much larger area. If that fails, take a small chip of the original paint (about the size of a quarter) to a paint store for a computer-aided color match.
Maintaining the Workspace
Drywall repair is a messy process, and keeping track of tools is essential for a stress-free experience. Utilizing organization systems for your DIY supplies can prevent frustration. For instance, smaller items like utility knife blades, sanding blocks, and tack cloths can be stored in car trunk storage bags if you are traveling to a rental property or a friend’s home to assist with repairs.

Conclusion: The Value of the Skill
Mastering the repair of small drywall holes is more than just a cosmetic fix; it is an entry point into the world of home maintenance and self-reliance. By understanding the properties of gypsum, the importance of feathering, and the necessity of priming, anyone can maintain the value and beauty of their living space.
Whether it is preparing a home for sale or simply refreshing a room after moving furniture, these techniques ensure that the walls remain a perfect, blank canvas for whatever life brings next. With patience and the right tools, those annoying little holes will become a thing of the past.

