Maintaining a bathroom involves more than just regular surface cleaning. Over time, the high-moisture environment and constant use lead to a variety of functional and aesthetic issues. Whether it is a slow-draining sink, a showerhead that has lost its pressure, or grout lines that refuse to brighten, these problems are common in almost every household. While some plumbing issues require professional intervention, many can be resolved with the right tools, materials, and techniques. This guide provides a detailed look at how to identify and fix common bathroom problems, ensuring the space remains functional, clean, and comfortable.
Resolving Slow and Clogged Drains
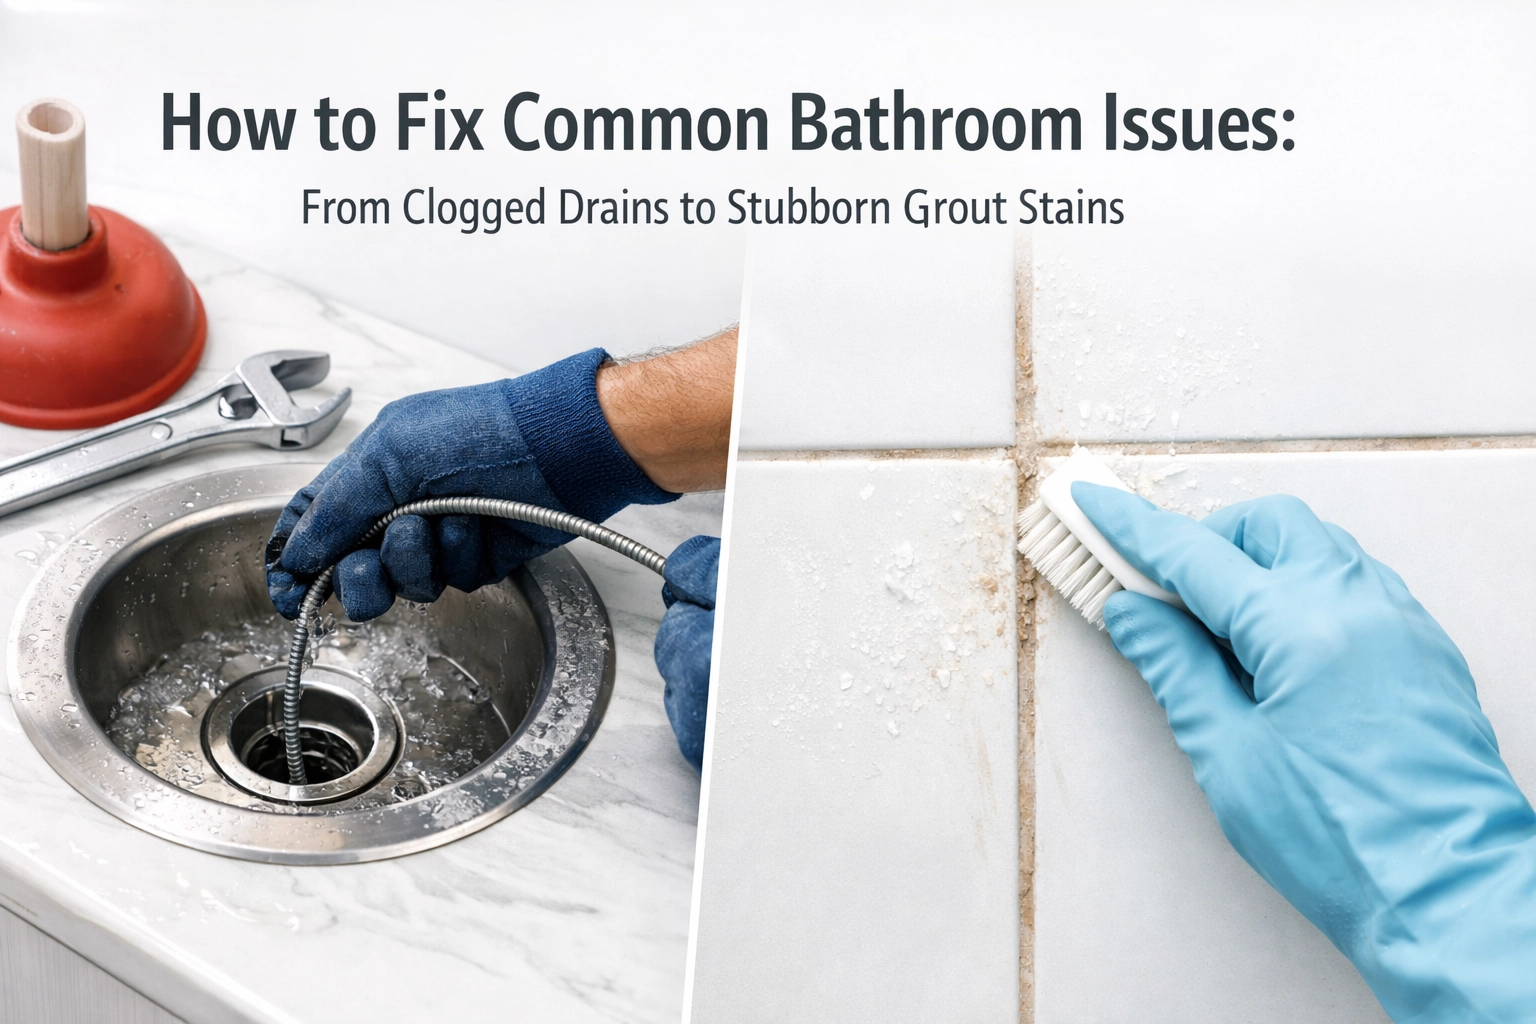
Drains in the bathroom are subject to a constant influx of hair, soap scum, and toothpaste residue. These materials often combine to form a thick, sticky mass that slows down water flow or stops it entirely. Identifying the type of clog is the first step in choosing the correct solution.
Mechanical Removal of Debris
For most minor clogs in sinks and showers, mechanical removal is the most effective and least invasive method. A plastic drain-cleaning tool, often referred to as a “Zip-It” tool, is a flexible strip with small barbs. Inserting this into the drain and pulling it back out can often snag and remove large clumps of hair and soap buildup. This is particularly effective for bathroom sinks where the clog is often located near the pop-up stopper.
If the clog is deeper in the pipes, a hand-cranked drain snake or auger may be necessary. By feeding the metal cable into the drain and rotating it, one can break up the obstruction or pull it back through the pipe. It is important to feed the snake slowly to avoid damaging the pipes or the ceramic finish of the fixture.

Utilizing Suction and Pressure
The plunger remains a fundamental tool for clearing bathroom clogs. For sink and tub drains, a standard cup plunger works best. To use it effectively, ensure there is enough water in the basin to cover the rubber cup. If the sink has an overflow hole, it should be blocked with a damp cloth to ensure the pressure is directed entirely toward the clog rather than escaping through the vent.
Natural Chemical Solutions
Before reaching for harsh industrial chemicals, which can damage pipes and harm the environment, a mixture of baking soda and white vinegar can often dissolve organic buildup. Pouring half a cup of baking soda followed by half a cup of vinegar down the drain creates a chemical reaction that helps break down soap scum. After letting the mixture sit for about 30 minutes, flushing the drain with a gallon of boiling water can clear away the remaining loosened debris.
Restoring Showerhead Water Pressure
Low water pressure in the shower is frequently caused by mineral deposits rather than a problem with the plumbing lines. In areas with hard water, calcium and magnesium build up inside the tiny nozzles of the showerhead, restricting flow.
The Vinegar Soak Method
To remove these deposits without dismantling the fixture, a simple vinegar soak is highly effective. Fill a plastic sandwich bag halfway with white distilled vinegar. Place the bag over the showerhead until the nozzles are fully submerged and secure the bag with a rubber band or zip tie. Leave the showerhead to soak for several hours or overnight. The acetic acid in the vinegar will dissolve the mineral scale. After removing the bag, running the hot water for a minute will flush out the dissolved particles.
Deep Cleaning the Aerator
If the water pressure issue is localized to a sink faucet, the culprit is likely the aerator: the small mesh screen at the tip of the spout. Using pliers (padded with a cloth to prevent scratching), unscrew the aerator. Disassemble the components and soak them in vinegar. A small brush can be used to scrub away any stubborn grit before reassembling.
Fixing Persistent Toilet Problems
Toilets are complex mechanical systems that can fail in several ways. From the sound of water constantly running to leaks at the base, these issues can lead to significant water waste if not addressed promptly.
Stopping a Running Toilet
A “running” toilet occurs when water continues to leak from the tank into the bowl after the flush cycle is complete. This is usually caused by a faulty flapper: the rubber seal at the bottom of the tank. Over time, the rubber degrades or becomes covered in mineral deposits, preventing a watertight seal.
To fix this, turn off the water supply behind the toilet and flush to empty the tank. Disconnect the old flapper from the chain and the flush valve pegs, then snap a new flapper into place. Ensure the chain has just enough slack so that the flapper can close fully but is tight enough to lift when the handle is pressed.

Adjusting the Water Level
Sometimes a toilet runs because the water level in the tank is too high, causing it to constantly drain into the overflow tube. This can be fixed by adjusting the float. On older ball-cock styles, one can gently bend the metal arm downward. On newer vertical-fill valves, there is typically a screw or a clip that allows for height adjustment. The water level should ideally be about one inch below the top of the overflow tube.
Addressing Leaks at the Base
If water is pooling on the floor around the base of the toilet, the wax ring that seals the toilet to the floor flange may have failed. This requires removing the toilet entirely. After turning off the water and disconnecting the supply line, the mounting bolts at the base are removed. The toilet is then lifted, the old wax is scraped away, and a new wax ring or a modern rubber gasket is installed before resetting the toilet.
Removing Stubborn Stains from Porcelain and Grout
The aesthetics of a bathroom are often marred by orange iron stains, green copper oxidation, or darkened grout lines. These stains are usually resistant to standard soap and water.
Porcelain Stain Removal
For stubborn rings in the toilet bowl caused by hard water, a wet pumice stone can be used to gently scrub the surface. It is vital to keep both the stone and the porcelain wet to avoid scratching the finish. For general stains on sinks or tubs, a paste of cream of tartar and hydrogen peroxide can be applied, left to sit for ten minutes, and then rinsed away.
Brightening Grout Lines
Grout is a porous material that easily absorbs oils, soap, and dirt, causing it to turn gray or black. To clean grout effectively:
- Prepare a Cleaning Paste: Mix baking soda with water to create a thick paste.
- Apply and Scrub: Apply the paste to the grout lines and scrub vigorously with a stiff-bristled brush.
- Use Oxygen Bleach: For more severe stains, oxygen bleach (sodium percarbonate) dissolved in water is safer and more effective than chlorine bleach for deep cleaning.
- Rinse and Seal: Once the grout is clean and dry, applying a grout sealer can prevent future staining by creating a water-resistant barrier.

Eliminating Unpleasant Odors and Improving Ventilation
Persistent odors in a bathroom can stem from various sources, including trapped moisture leading to mildew or dry p-traps allowing sewer gases to enter the room.
Addressing Dry P-Traps
If a bathroom is used infrequently, the water in the p-trap (the U-shaped pipe under the sink or tub) can evaporate. This water acts as a seal against sewer gases. Simply running water into every drain for a few minutes once a week can maintain this seal and prevent odors.
Managing Biofilms and Bacteria
Odors that seem to come from the floor or the drain itself are often caused by “biofilm”: a colony of bacteria that feeds on soap and hair. Bio-enzymatic cleaners are the most effective solution here, as they contain live bacteria cultures that “eat” the organic matter causing the smell. These should be applied and left overnight to work.
Improving Airflow
Proper ventilation is essential for preventing the growth of mold and mildew, which carry their own musty scents. Ensure the exhaust fan is free of dust by vacuuming the cover regularly. If the bathroom lacks a fan, keeping the door open after showers or utilizing a window is necessary to lower humidity levels.
Maintaining Bathroom Organization and Fixtures
A cluttered bathroom is harder to clean and can lead to moisture being trapped under bottles and containers, contributing to grout and caulk degradation.
Organizing the Vanity
Keeping the countertop clear makes it easier to wipe down surfaces daily, preventing the buildup of grime. Utilizing organizers such as the desk is arranged in a 360-degree rotating cosmetic receiving box can keep daily items accessible but contained. For personal items that need to remain discreet and dry, products like the aunt towel storage bag help maintain an orderly space.

Replacing Worn Caulking
Caulk is the flexible sealant used where the bathtub or sink meets the wall. Over time, it can crack, peel, or grow mold. If cleaning does not remove the black spots, the caulk must be replaced.
- Remove the Old Caulk: Use a caulk removal tool or a utility knife to carefully slice away the old material.
- Clean the Joint: Wipe the area with rubbing alcohol to remove any residue and kill remaining mold spores.
- Apply New Caulk: Use a high-quality 100% silicone caulk designed for bathrooms. Apply a steady bead and smooth it with a wet finger or a caulking tool for a professional finish.
Addressing Minor Hardware Failures
In addition to plumbing, hardware like towel racks, cabinet hinges, and mirrors can become loose or damaged due to the high-humidity environment.
Tightening Loose Fixtures
Most bathroom accessories, such as towel bars and toilet paper holders, are held in place by a small “set screw” on the underside of the bracket. If the fixture feels wobbly, use a small flathead screwdriver or hex key to tighten this screw. If the bracket itself is pulling out of the drywall, it may be necessary to remove it and install toggle bolts or heavy-duty anchors for a more secure hold.
Caring for Mirrors and Glass
Steam and humidity can eventually damage the silvering on the edges of mirrors. To prevent this, avoid spraying glass cleaner directly onto the mirror; instead, spray it onto a microfiber cloth. This prevents the liquid from seeping behind the glass and causing “mirror rot.” For shower doors, a daily squeegee routine is the best way to prevent hard water spots from etching the glass permanently.
Essential Bathroom Maintenance Toolkit
Keeping a small dedicated toolkit for bathroom repairs can make addressing these issues much faster. A well-stocked kit should include:
- Plungers: Both a cup type (for sinks) and a flange type (for toilets).
- Wrenches: An adjustable wrench and a pair of tongue-and-groove pliers.
- Screwdrivers: A multi-bit screwdriver for various fixture screws.
- Drain Tools: A plastic Zip-It tool and a basic hand auger.
- Cleaning Supplies: White vinegar, baking soda, a stiff grout brush, and a pumice stone.
- Sealants: A tube of bathroom-grade silicone caulk and a caulking gun.
Regular inspections can help catch issues before they become major repairs. Checking under the sink for dampness, testing the toilet for silent leaks with a few drops of food coloring in the tank, and ensuring the ventilation fan is pulling air effectively are simple habits that preserve the longevity of the bathroom.

By understanding the mechanics of bathroom fixtures and the chemical nature of common stains, one can maintain a pristine and fully functional environment. Most common issues do not require a complete renovation or expensive professional services; rather, they require a methodical approach and a few basic household supplies. Consistent maintenance not only improves the daily experience of using the space but also prevents the long-term water damage that can compromise the structure of the home. For more home organization ideas, you can explore the full sitemap for additional resources on maintaining an efficient household.

