Low water pressure is a common household grievance that can transform simple daily tasks into frustrating chores. Whether it is a shower that feels like a light drizzle or a washing machine that takes an hour to fill, the symptoms of poor water flow are unmistakable. Identifying the root cause is the first step toward restoring a home’s plumbing system to its optimal performance. This guide provides a comprehensive analysis of the factors contributing to low water pressure and offers detailed, actionable solutions to resolve them.
Understanding the Difference Between Pressure and Flow
Before troubleshooting, it is essential to distinguish between water pressure and water flow. Water pressure refers to the force that pushes water through the pipes, measured in pounds per square inch (PSI). Water flow is the volume of water coming out of a fixture, measured in gallons per minute (GPM). While they are related, a problem with one does not always mean a problem with the other. A clogged aerator might restrict flow, while a faulty regulator might lower pressure across the entire system.
Establishing a Baseline: How to Measure Water Pressure
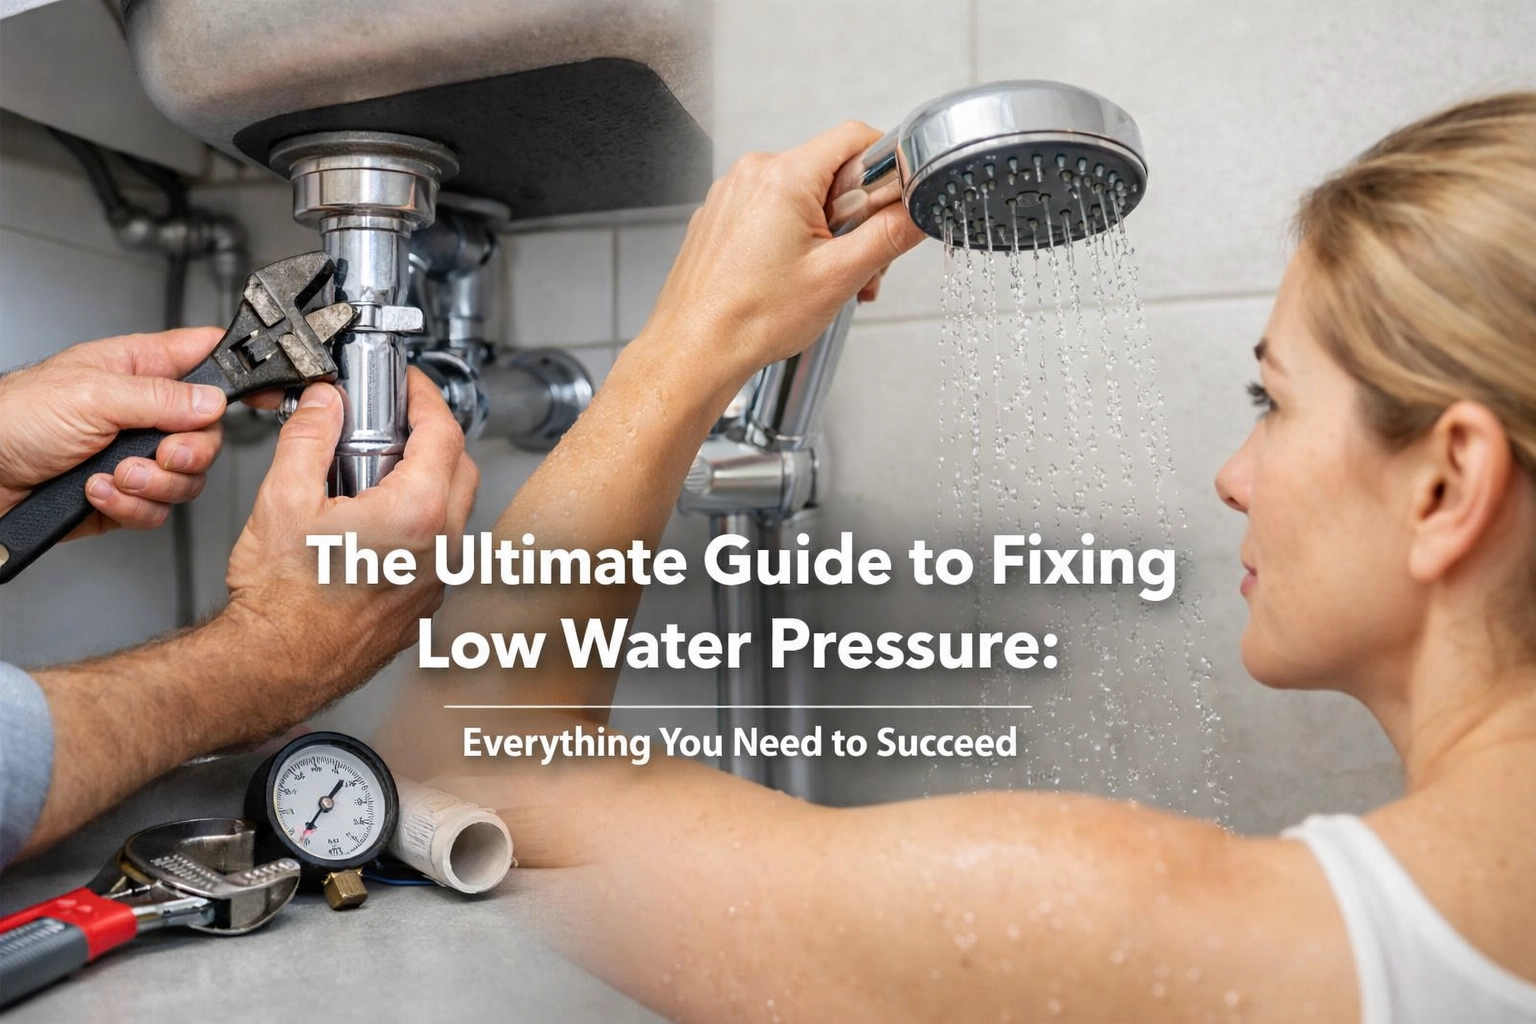
To accurately diagnose the issue, one must obtain a numerical reading of the current pressure. Residential water systems typically operate between 40 and 80 PSI. Anything below 40 PSI is generally considered low, while anything above 80 PSI can damage pipes and appliances over time.
To measure pressure, a standard water pressure gauge is required. This tool is inexpensive and can be found at most hardware stores.
- Locate an outdoor hose bib (faucet) that is closest to the main water supply line.
- Ensure all water-using appliances, such as dishwashers and washing machines, are turned off. No faucets should be running inside the house.
- Screw the pressure gauge onto the faucet.
- Open the faucet completely and observe the needle on the gauge.
- Record the reading. If the reading is significantly below 40 PSI, the issue likely lies with the main supply or a whole-house component.

Categorizing the Scope of the Problem
Determining whether the issue is isolated or widespread narrows down the list of potential culprits.
- Single Fixture: If the low pressure only occurs at one kitchen sink or one specific showerhead, the problem is likely a localized clog or a faulty fixture component.
- Entire Room: If all fixtures in a bathroom are affected, the issue may be in the branch lines serving that specific area.
- Whole House: If every faucet and appliance in the home exhibits weak flow, the problem is usually related to the main shut-off valve, the pressure regulator, or the municipal supply.
- Hot Water Only: If cold water pressure is fine but hot water is weak, the issue is almost certainly located within the water heater or the hot water exit lines.
Addressing Localized Issues: Faucets and Showerheads
When low pressure is confined to a single point of use, the fix is often simple and requires minimal tools.
Cleaning the Aerator
The aerator is the small mesh screen at the tip of a faucet. Its purpose is to introduce air into the water stream to prevent splashing and conserve water. Over time, calcium, lime, and debris can accumulate here.
To clean an aerator, unscrew it from the end of the faucet by hand or using a pair of pliers (wrap the pliers in a cloth to avoid scratching the finish). Disassemble the components and soak them in white vinegar for at least 30 minutes. Use an old toothbrush to scrub away any remaining mineral deposits. If the screen is damaged or the buildup is too severe to remove, replacement aerators are readily available.
De-clogging Showerheads
Similar to aerators, showerhead nozzles frequently become blocked by mineral scale, particularly in regions with hard water. If the water sprays in irregular directions or the flow is weak, the showerhead requires attention.
A common method involves filling a plastic bag with white vinegar and securing it around the showerhead with a rubber band, ensuring the nozzles are fully submerged. After several hours, remove the bag and run hot water to flush out the dissolved minerals. For more thorough cleaning, the showerhead can be removed and soaked in a bowl of vinegar.
Replacing Faucet Cartridges
If cleaning the aerator does not help, the internal cartridge of the faucet may be blocked or worn out. This is common in single-handle faucets. To replace a cartridge, the water supply to that sink must be shut off using the local valves under the cabinet. The handle is then removed (usually by loosening a small hex screw), and the cartridge is pulled out and replaced with an identical model.

Checking the Main Water Valves
It is surprisingly common for low pressure to be caused by a valve that is not fully open. There are typically two main valves that control water flow into a home.
The Homeowner’s Shut-off Valve
This valve is usually located inside the home, often in a basement, crawlspace, or utility closet near where the main pipe enters the building. It may also be located near the water heater. If it is a gate valve (a round wheel handle), ensure it is turned fully counter-clockwise. If it is a ball valve (a lever handle), the lever should be perfectly parallel to the pipe. Even a slight turn away from the fully open position can significantly restrict pressure.
The Water Meter Valve
The second valve is located at the water meter, which is often in a concrete box near the street or sidewalk. This valve belongs to the water utility company, but homeowners can check if it is fully open. Because these valves are often difficult to turn and may require a “meter key,” it is sometimes best to contact the local water department to verify its status.
The Pressure-Reducing Valve (PRV)
Many homes are equipped with a pressure-regulating valve (PRV). This device is shaped like a bell and is typically located on the main supply line. Its job is to take high-pressure water from the city and slow it down to a safe level for the home’s plumbing.
Testing and Adjusting the PRV
If a PRV fails, it can either cause a dangerous spike in pressure or, more commonly, a significant drop. To see if the PRV is the issue, one can adjust the screw on top of the device.
- Loosen the lock nut on the adjustment screw.
- Turn the screw clockwise to increase pressure or counter-clockwise to decrease it.
- Turn the screw in small increments (half-turns) and check the pressure at a nearby faucet.
- If turning the screw has no effect on the water flow, the internal diaphragm of the PRV has likely failed, and the entire unit needs to be replaced.

Investigating the Water Heater
When the pressure drop is only noticeable when using hot water, the water heater is the primary suspect.
Sediment Buildup
As water is heated, minerals like calcium and magnesium settle at the bottom of the tank. Over years of use, this sediment can accumulate to the point where it blocks the hot water outlet pipe or reduces the volume of water the tank can hold. Flushing the water heater once a year is a vital maintenance task. This involves connecting a hose to the drain valve at the bottom of the tank and allowing the water to run until it is clear of debris.
Shut-off Valve Issues
Check the cold water shut-off valve leading into the water heater. Like the main shut-off valve, if this is partially closed, it will restrict the flow of hot water throughout the entire house.
Identifying Hidden Leaks
A significant leak in the plumbing system can divert water flow away from fixtures, resulting in low pressure. While some leaks are obvious: such as a puddle in the basement: others are hidden behind walls or under the foundation.
The Meter Test
The most effective way to check for hidden leaks is using the water meter.
- Turn off all faucets and water-consuming appliances.
- Locate the water meter and record the current reading.
- Wait exactly two hours without using any water.
- Check the meter again.
- If the number has changed, water is escaping somewhere in the system.
A small change might indicate a running toilet, while a large change suggests a significant pipe breach. For more information on system maintenance, visiting the Paris Wheel blog can provide further insights into home care.
Pipe Material and Corrosion
In older homes, the pipes themselves may be the cause of the problem.
Galvanized Steel Pipes
If a home was built before the 1960s and still uses original galvanized steel pipes, internal corrosion is almost guaranteed. Over decades, rust builds up inside the pipes, much like plaque in an artery. This narrows the path for water, eventually reducing flow to a trickle. Unfortunately, there is no way to “clean” the inside of these pipes; the only permanent solution is a “re-pipe,” which involves replacing the old steel with modern copper or PEX (cross-linked polyethylene) piping.

Hard Water Scale
Even in homes with copper pipes, hard water can lead to “scaling.” This is a buildup of mineral deposits that restricts flow. Installing a water softener can prevent this from getting worse, but it may not be able to reverse significant existing buildup in the lines.
Problems with Municipal Supply
Sometimes, the issue has nothing to do with the home’s internal plumbing.
- Peak Demand: In some neighborhoods, water pressure may drop during times of high demand, such as early morning when everyone is showering or during summer evenings when many people are watering lawns.
- Water Main Repairs: If the city is working on water lines nearby, pressure may be temporarily reduced or air may be trapped in the lines.
- Widespread Issues: If neighbors are also experiencing low pressure, the problem is likely with the municipal supply or a water tower. In these cases, contacting the local water authority is the only course of action. More information on contacting support for various services can be found at Customer Help.
Well Water Systems
For homes that rely on a private well rather than municipal water, the diagnostic process is different.
The Pressure Tank
Well systems use a pressure tank to maintain consistent flow. Inside the tank is an air bladder. If the bladder loses air or the tank becomes “waterlogged” (filled entirely with water), the pump will cycle on and off rapidly, and pressure will fluctuate wildly. Checking the air pressure in the tank (when the water is drained) using a tire gauge can help diagnose this. The air pressure should typically be 2 PSI below the pump’s “cut-in” pressure.
The Well Pump
As pumps age, they become less efficient at pulling water from the ground. If the pump is old or the water table has dropped, the system will struggle to provide adequate pressure. A professional well technician is usually required to service or replace these components.

When to Call a Professional
While many pressure issues can be solved with DIY methods like cleaning aerators or adjusting a PRV, some situations require the expertise of a licensed plumber. Professional intervention is recommended if:
- The source of a leak cannot be located.
- The main water line needs to be replaced.
- The issue involves complex repairs to a water heater or well system.
- The homeowner is uncomfortable working with soldering tools or cutting into main lines.
Consulting the Frequently Asked Questions or reaching out through the Contact Us page can help clarify when professional assistance is the safest path forward.
Long-Term Maintenance and Prevention
Maintaining consistent water pressure is largely a matter of routine care. Implementing a few simple habits can prevent pressure drops from occurring in the future.
- Annual Heater Flush: Regularly removing sediment from the water heater keeps the hot water lines clear.
- Valve Exercise: Twice a year, turn the main shut-off valves off and back on again. This prevents them from seizing up due to mineral buildup or corrosion.
- Water Softening: If a home has hard water, a softening system protects every fixture and pipe from mineral scale.
- Regular Inspections: Periodically checking under sinks and around the water heater for small leaks or “weeping” joints can catch problems before they lead to a pressure drop or water damage.
By understanding the mechanics of how water enters and travels through a home, one can systematically eliminate potential issues. Whether it is a simple cleaning of a fixture or a more involved replacement of a regulator, the steps outlined above provide a clear roadmap to achieving and maintaining optimal water pressure for a more comfortable and efficient home environment. For those interested in further learning about home systems and technical skills, exploring the about page provides more context on educational resources available.

