A cluttered pantry is a common source of daily stress for busy families. When items are stacked haphazardly, meal preparation takes longer, food waste increases due to forgotten expiration dates, and grocery shopping becomes inefficient because it is difficult to see what is already in stock. Achieving an organized pantry is not merely about aesthetic appeal; it is about creating a functional system that supports the flow of a household. By following a structured approach, any pantry space: regardless of size: can be transformed into a streamlined hub that stays tidy over the long term.
Managing a home involves many moving parts, and the kitchen is often the most frequented area. Within that space, the pantry serves as the primary storage for nourishment. When this space is chaotic, the ripple effect reaches into every mealtime. Developing a sustainable organization system requires a one-time intensive effort followed by small, consistent habits. The goal is to create a “set it and forget it” environment where every item has a dedicated home, making it easy for every family member to find what they need and, more importantly, put things back where they belong.
Step 1: The Full Audit and Purge
The first step in any successful organization project is to clear the slate. It is impossible to organize a space that is filled with items that are no longer needed or used. For a busy family, this means setting aside a few hours to completely empty the pantry.
Emptying the Shelves
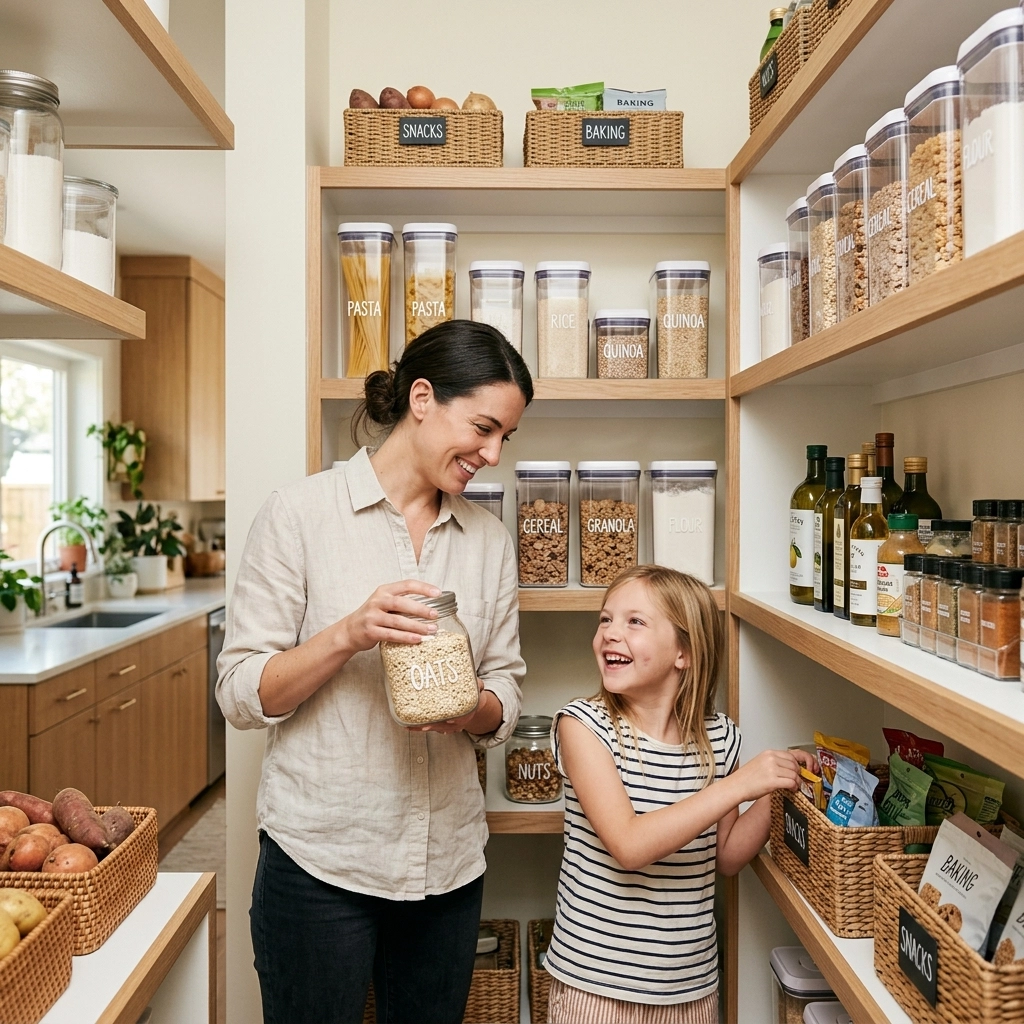
Every single item must be removed from the pantry shelves. This includes bulk items, small spice jars, and appliances stored in the back corners. Placing everything on a kitchen island or dining table allows for a full visual assessment of the inventory. This is also the ideal time to wipe down the shelves, remove crumbs, and perhaps apply fresh shelf liners. Clean surfaces provide a psychological “fresh start” that encourages better maintenance.
Sorting and Categorizing
As items are removed, they should be grouped into broad categories. This might include:
- Grains and Pastas: Rice, quinoa, spaghetti, oats.
- Baking Supplies: Flour, sugar, baking soda, chocolate chips.
- Canned Goods: Soups, beans, vegetables, sauces.
- Snacks: Granola bars, crackers, chips, nuts.
- Breakfast Items: Cereal, pancake mix, syrups.
- Dinner Essentials: Oils, vinegars, stocks, jarred sauces.
The Purging Process
Once sorted, examine each item critically. Check expiration dates and discard anything that has passed its prime. For items that are still safe to eat but that the family does not enjoy or plan to use, consider donating them to a local food bank. The goal is to only return items to the pantry that will actually be consumed. This process prevents “organized clutter,” where expired goods are neatly arranged but remain useless.

Step 2: Create Logical Zones Based on Activity
A pantry functions best when it is mapped out according to the daily habits of the household. Rather than just placing items where they fit, think about “zones” that correspond to specific activities or frequencies of use.
The Concept of Prime Real Estate
“Prime real estate” refers to the area between the eye level and the waist. This is the most accessible part of the pantry. Items used every single day: such as coffee, school lunch snacks, or frequently used oils: should live here. Placing these items within easy reach minimizes the time spent searching during a morning rush.
Specialized Zones
- The Kids’ Zone: For families with children, dedicated lower shelves for healthy snacks and lunchbox staples are essential. When children can reach their own snacks, it fosters independence and reduces the number of times parents are interrupted. Clear bins are particularly helpful here so children can see exactly what is available.
- The Baking Station: Grouping all baking ingredients together means that when it is time to make cookies or bread, only one bin or section needs to be accessed. This prevents flour and sugar from being scattered across different shelves.
- The Dinner Prep Zone: This area should house pasta, grains, and canned sauces. Keeping these together makes it easier to visualize meal components during evening cooking.
- Bulk and Backstock: Higher shelves or the very bottom floor area are best for bulk items like large bags of rice, extra paper towels, or vinegar refills. These are items that are only accessed once or twice a month.
Using zones helps keep the pantry intuitive. When everyone knows that the “bottom left is for snacks” and the “top right is for baking,” the system becomes self-sustaining. For more ideas on managing household spaces, browsing through everyday living resources can provide additional inspiration for maintaining an orderly home.
Step 3: Invest in Functional Storage Solutions
Once the zones are defined, the next step is to choose the right containers. Containerization is the secret to maximizing space and keeping items fresh. However, it is important to measure the depth, width, and height of the shelves before purchasing any bins or jars.
Decanting Dry Goods
Decanting: the process of moving food from its original packaging into clear, airtight containers: is highly effective for busy families. Original packaging is often bulky, awkwardly shaped, and prone to spills once opened.
- Visibility: Clear containers allow for an instant inventory check. It is easy to see when the flour is running low or when the cereal is almost gone.
- Freshness: Airtight seals keep crackers, cereal, and baking supplies fresh for much longer than a rolled-up bag and a clip.
- Uniformity: Square or rectangular containers stack more efficiently than bags, utilizing the full depth of the shelf.
Bins and Baskets
Not everything needs to be decanted. For items like chip bags, granola bars, or pouches of fruit snacks, large open-top bins are more practical.
- Wire Baskets: Good for items that need airflow, like onions or potatoes (if kept in a dark part of the pantry).
- Woven Baskets: Great for hiding “ugly” packaging or miscellaneous items that don’t fit a specific category.
- Clear Plastic Bins: Ideal for refrigerated items or pantry snacks, as they are easy to clean and allow light to pass through, keeping the space bright.
For those looking to upgrade their kitchen organization, exploring kitchen and dining storage can yield specialized tools designed for these exact needs.

Step 4: The Power of Labeling
Labels are the communication system of the pantry. While a homeowner might know exactly where the gluten-free flour is, other family members or guests may not. Labels ensure that everyone who uses the space understands the system.
Why Labeling Works
Labeling removes the guesswork. When a bin is labeled “Snacks,” there is no excuse for a box of crackers to end up in the “Baking” section. This is especially important for maintaining the organization long-term. If the system is clear to everyone, the burden of tidying doesn’t fall on just one person.
Types of Labels
- Chalkboard Labels: These are versatile and allow for easy changes if the contents of a jar are switched.
- Printed Vinyl Labels: These offer a clean, professional look and are highly durable.
- Handwritten Tape: For a quick and budget-friendly option, painter’s tape and a permanent marker work well, particularly for noting expiration dates on the back of containers.
When labeling, it is often better to label the container or the bin rather than the shelf. This allows the flexibility to move a bin to a different shelf without having to peel off a sticker. Including the “best by” date on the bottom or back of a decanted jar is a professional-level tip that ensures food safety and quality.

Step 5: Establish a Maintenance Routine
The biggest challenge with pantry organization is not the initial setup, but the upkeep. Without a routine, even the most beautiful pantry will return to chaos within a few weeks.
The FIFO Method
Adopted from professional kitchens, FIFO stands for “First In, First Out.” When returning from a grocery trip, place the newest items behind the older ones. This ensures that the oldest stock is used first, significantly reducing food waste.
The Weekly Reset
A busy family should aim for a five-minute pantry reset once a week, ideally right before grocery shopping. During this time:
- Straighten up the bins.
- Check for any empty containers that need refilling.
- Dispose of any stray crumbs or spills.
- Make a list of what is actually needed, preventing overbuying.
The “One-In, One-Out” Rule
To prevent overcrowding, try to maintain a “one-in, one-out” policy for specialty items. If a new type of exotic sauce is purchased, an old, unused condiment should be cleared out. This keeps the volume of items consistent with the available space.
Effective home storage solutions are built on these small, repeatable actions. When the system is easy to maintain, it becomes a natural part of the household rhythm rather than a chore.

Advanced Tips for Tricky Spaces
Some pantries have unique challenges, such as deep corners or very high ceilings. Addressing these specifically can unlock even more storage potential.
Utilizing Vertical Space
If there is significant a gap between the top of the items and the shelf above, consider using shelf risers. These “mini-shelves” allow for two layers of canned goods or small jars without stacking them directly on top of each other, which often leads to items falling over. Over-the-door organizers are also excellent for small pantries, providing extra space for spices, wraps, or small snacks.
Corner Solutions
Deep corners are often where food goes to die. To combat this, use a Lazy Susan (turntable). Turntables allow for 360-degree access to oils, vinegars, or condiments that would otherwise be lost in the shadows. By spinning the tray, everything is brought to the front.
Lighting
A dark pantry is a disorganized pantry. If the space lacks built-in lighting, battery-operated motion-sensor LEDs can be installed. Being able to see into the corners makes it much more likely that the organization system will be respected.
The Long-Term Benefits of an Organized Pantry
Investing the time into a 5-step pantry organization plan yields rewards that go far beyond a tidy kitchen. For a busy family, the benefits are practical and financial.
First, there is a significant reduction in food waste. When items are visible and categorized, they are used before they expire. Second, grocery shopping becomes much more efficient. A quick glance at the labeled bins tells a homeowner exactly what is missing, preventing the “double-buying” of items already hidden in the back of a cupboard. Finally, meal prep becomes a calmer experience. When ingredients are easy to find and reach, the friction of cooking dinner after a long day is greatly reduced.
By treating the pantry as a dynamic system rather than a static storage closet, families can maintain order with minimal effort. It starts with a purge, continues with a logical layout and the right tools, and is preserved through simple, consistent habits. An organized pantry is a gift to the entire household, creating a sense of calm and efficiency in the heart of the home.

